WordPress and woocommerce integration with native flat shipping set up

Shipping(배송)은 항상 복잡한 내용중의 하나입니다. 그리고 저희가 추천해 드리는 것은 먼저 간단한 flat rate 인데 이것 자체도 저희가 제품을  잘 모르기 때문에 뭐라고 단순히 말씀드리기 쉽지 않습니다.

Shipping 가격은 밑의 내용들로 주로 셋업이 됩니다.

      • 무게, 위치 및 배송 속도에 따른 가변량
      • 고객이 주문한 품목에 관계없이 $ 5.00와 같은 고정 요금
      • 무료 배송
      • In-store pick up


배송에 관련해서 잘 알고 계시겠지만 배송업체로는 USPS, UPS 그리고 Fedex가 있지만 모두다 셋업하기도 그렇고  이중에서 하나를 선택하더라도 올리는 모든 제품의 무게와 사이즈가 정확하게 제품에 넣어져야 배송비 계산이 정확하게 이루어 집니다.

여기에 배송 label 까지 인쇄도 직접 가능하지만 이렇게 되면 여러가지 extension 소프트웨어를 플러그인으로 구입하고 서비스도 따로 받아야(subscribe) 합니다. 바로 이부분 때문에 제가 처음에 권해드리는 것은 가격에 따라 flat shipping  fee($5-10) 으로 먼저 시작하는게 좋을듯 합니다. 

사이트의 트랜젝션이 늘어나서 어느 정도의 수준에 오르면 그때 더 쉽핑 서비스를 더하고 개선해도  좋을듯 합니다. 아니면 그전부터 만들어서 한달 사용료 등등을 서비스비용으로 지불하게 되면 사이트 운영비용으로 더 커지게 됩니다.


그럼  시핑비를  더하는 기능에 대해서 알려드리겠습니다.

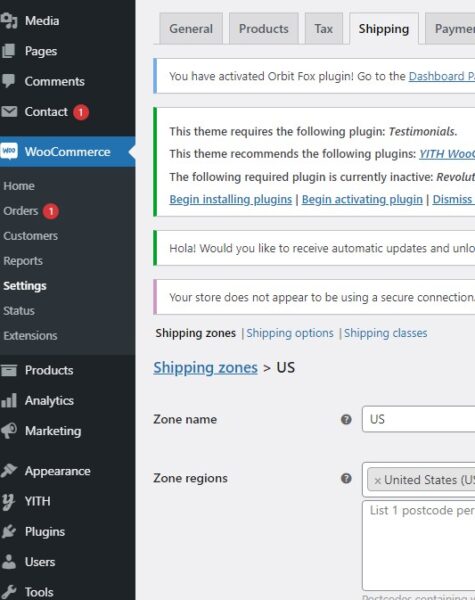
먼저 관리자페이지 로그인하시면 왼쪽 메뉴에서 WooCommerce를 선택하시고 sub menu 에서 Settings를 선택하면 아래의 그림과 같이 나오는데 그중에서 Shipping을 선택하면 됩니다.

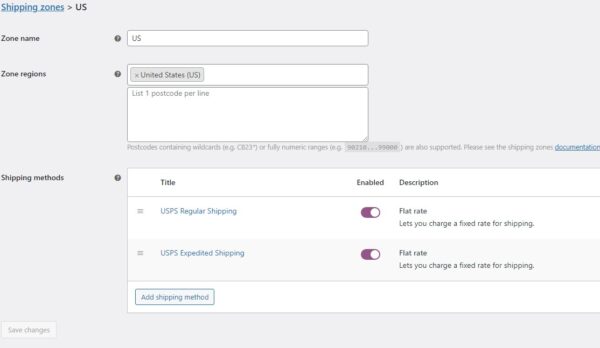
그안에서 Shipping Zone을 생성하면 됩니다. 즉 쉽핑주소가 여기서 생성된 지역에 해당되면 자동으로 쉽핑방법이 카트에서 보여주게 되는 경우입니다.

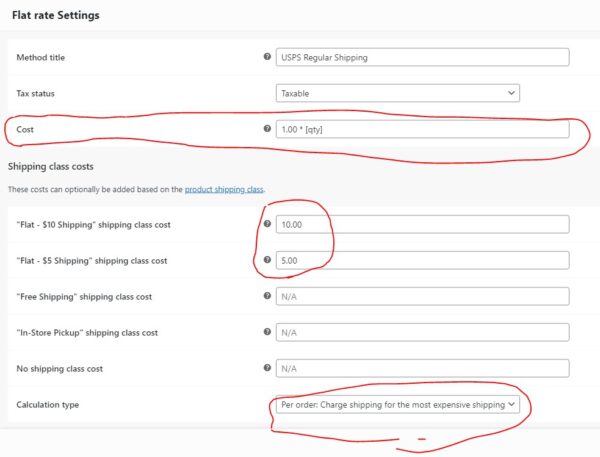
그중에 USPS Regular Shipping을 선택하시면 아래와 같이 수정을 할수 있는 페이지가 나옵니다. 여기서 cost section 은 기본 요금입니다. $1가 기본이고 제품수가 늘어나는 데로 기본 코스트가 늘어 납니다.

예를 들어서 제품 Shipping Class Cost가 $5에 셋업이 되어 있고 제품을 2개를 구매했다고 하면 쉽핑 가격은 1*2 + 5 즉, 7불이 됩니다. (1.00 * [qty] + $5)


위와 같은 방식으로 USPS  Expedited Shipping 은 아래의 쉽핑 계산 방식으로 만들어 놓을 수 있습니다.


기본 베이스 계산은 10 * ( 1.[qty] ) , 즉 1개를 구입하면 기본 가격은 $11에 제품 Shipping Class Cost 를 더하면 됩니다.

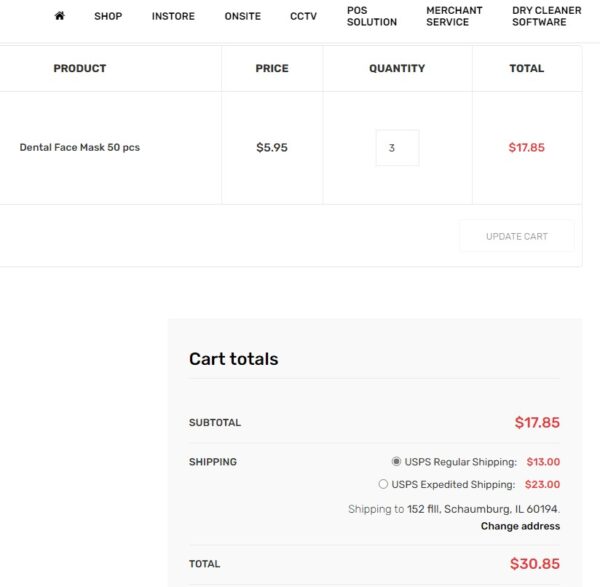
예를 들면 밑의 쇼핑카트 처럼 Shipping Class Cost 가 $10인 제품을 3개를 구매하고 Expedited Shipping 을 선택하면 시핑가격은 10*(1.3) +10 =$23 .


지금까지의 내용처럼  쉽핑 옵션을 셋업하는 방법이었습니다.


밑의 스탭들은 제품에 특정 배송가격을 정해주기위한 순서들입니다.

먼저 위에서도 설명하였지만.. 제품 자체에는 Shipping Class Cost를 정해줄 수 있습니다.


위에 보이는 그림처럼 Shipping Class를 선택하면 됩니다. 그럼 밑의 내용처럼 나옵니다.


이중에서 “Add Shipping Class” 를 선택하고 새로운 시핑 클래스를 만둘고 왼쪽에 있는 Save버튼을 누르면 됩니다.

이렇게 생성된 클래스를 제품에 직접적으로 연결을 해줘야 합니다.

왼쪽메뉴에 “Products”를 선택하고  아래메뉴로 “All Products”선택하면 됩니다. 그리고 그중에서 원하는 제품을 선택후  Shipping 을 선택하고 그중에서 “Shipping  Class”를 맞게 선택하면 됩니다.


그 이외에 지역 zone으로 더 디테일하게 프리쉽이나 인스토어 픽업등을 셑업해야 하는 경우는 위의 첫번째 존 샡업에서 주를 선택하여 프리쉽이나 인스토어 픽업등을 더 첨부 할수 있습니다.


코비드 백신 접종받은 후기 (모더나 1차)

코비드-19이 알려진뒤 일년이 지나서야 백신 접종을 미국에서 받으면서 이것이 끝이 아니지만 어느정도 안도감을 느끼게 됨은 사실이다.  접종이 미국에서 몇달전부터 시작되면서 등록을 하였지만 그 어느곳에서도 가능하지 않아 예약을 잡지 못하고 있다가 우연히  와이프와 함께 오픈 슬롯을 찾아서 등록을 하고 맞게 되었다.

파이저나 모더나 아니면 J&J중에 선택을 할 수 있는게 있었지만 2번을 접종을 받는 파이저나 모더나 백신중에 하나를 맞게 된다고 연락이 왔다.  서류는 접종 카테고리 순서에 맞는지를 확인해 주는 서류와 웨이버 등인데 카테고리 순서를 증명하는 서류는 확인하지 않고 바로 본인인지 확인하면 접종이 된다. 아무래도 이미 중요한 필수직들은 대부분 접종이 된 상태인지라 이차 순번과 노인들 우선 순위이기에 굳이 시간을 들여 카테고리 순위에 관련된 서류를 확인하지 않고 예약이 되면  본인인것만을 확인뒤에 접종이 되는 것 같다.

접종후 4-5시간 후부터 주사맞은 부위가 아프기 시작하면서 잠을 설치게 되었다. 아무래도 주사맞은 부위가 아파서 그쪽으로는 눕지도 못하고 심장 박동이 약간 빨라진 것 같은 기분도 들어서 인지 주사를 맞은 날은 밤새 제대로 잠에 들지 못했던 것 같다.

2차 접종은 4주뒤로 잡아주었다. 파이저는 3주 뒤에 2차 접종을 하지만 모더나 자체가 일주일 더 뒤에 하는 정확한 이유는 알수 없다.  또한 J&J는 한번의 접종으로 쉽게 끝난다.

물론 이차 접종을 하는 파이저나 모더나의 경우 보다는 면역율이 떨어지지만 한번의 접종으로 수비게 70% 정도의 면역율이면 차라리 안맞는 것 보다는 코비드를 약화 시키는 데 아무래도 큰 일조를 할 수 있지 않을까 생각한다.

현재 미국 특히 일리노이주는 접종 순위와 관계없이 모든 시민들에게 접종을 받을 수 있게  되었다. 연령이나 직군에 관계없이 백신만 있으면 누구든 예약과 동시에 접종이 된다.  이순간에는 어떤 종류의 백신이 어떻게 좋고 나쁘고를 떠나서 일단 전국민이 가능하면 많이 접종하면서 면역률을 높이는게 최선일 것이다.

이 순간에 최고의 관심사는 당연히 백신의 지속성일 것이다. 안전성이나 효율을 따지기 보다는 전국민의 백신접종과 이에 따른 코비드의 면역력을 높여 주는 것만이 본인과 가족의 안전을 보장하는 것이다.

iPhone with Samsung Galaxy Watch3 & Apple Watch(삼성 갤럭시 워치3 를 애플 아이폰에서 애플워치와 함께 사용하기)

오랜 기간동안 애플 아이폰과 애플워치를 사용하다보니 애플의 디지털적인 페이스도 그렇고 전체적인 디자인이  시간이 지날수록 밍밍해지기 마련이라 삼성 갤럭시 워치3를 프로모션 기간중이라 싼 가격에 살 수 있어서 아이폰에 연결이 가능하다고하니  연결을 시도해 보기로 했다.

먼저 아이폰에 연결하기전에 몇가지 안되는 기능들이 있는데… 굳이 안되는 기능들을 따지기 전에 아날로그 디자인 자체와 큼직한 스크린으로 타이젠 OS가 주는 로테이션 네비게이션 기능 등이 애플워치에서 제공하는 기능보다는 신선하게만 느껴졌다.

단점으로는 ECG 및 혈압체크 기능 등이 아예 미국에서 판매되는 갤럭시 제품에서 사용을 막아 놓았기에 삼성폰이나 앤드로이드에서 사용되는 기능들이 안되기에 굳이 특별히 다른 기능들의 장점을 살릴수 없기 때문에 기능상으로는 크게 다르게 장점이나 단점이 있을 수 없다.

먼저 애플폰에서 갤럭시 워치3는 간단히 연결된다. 애플스토어에서 갤럭시 워치 앱을 다운받고 페어링을 시도하면 어렵지 않게 연동이 된다.

그럼 모든 노티스 즉 전화나 메세지, 카카오톡 등을 받을 수 있고 읽을 수 있다.  그정도면 아이폰에서 갤럭시 워치를 연결해서 쓸만한 충분한 가치가 있다. 단지 문제는 기존에 연결 되었던 애플워치와 어떻게 사이좋게 사용하는지가 관건이었다.

일단 삼성 갤럭시 워치3가 연결되면 블루투스로 연결되면서 기존의 블루투스로 연결된 애플워치와 믹스가 되어 노티스를 전부 갤럭시 워치3에서 오버라이드한다. 즉, 애플워치는 노티스를 쉐어 받지 못하면서 공중에 떠있는 스탠드어론 모드로 바뀌어져 있다. 이 부분을 확실히 만들기 위해서 연결된 애플워치 모드를 에어플레인 모드로 바꾸어 주면 갤럭시워치가 정상적으로 제대로 작동한다.

반대로 애플워치를 사용하게 되면 갤럭시 워치를 에어플레인 모드로 바꾸어주고, 애플워치를 다시 에어플레인 모드에서 정상모드로 바꾸어 준다. 이런식으로 사용때마다 바꾸어주면 노티스 기능들이 정상적으로 작동한다. 단지 갤럭시 워치3는 다시 정상모드로 바뀔때마다 새로 페어링을 해야하는 부분이 있다. 그러기 위해서는 기존에 있던 블루투스 페어링모드를 아이폰에서 지우고 하면 손쉽게 페어링이 된다.


Alexa Echo flex motion detect sensor with routine

This motion detection sensor is working great most of time to sense the motion and triggering the assigned action in Alexa routine.

For example, you can turn on any smart light without hesitation to set it in the routine. you can trigger the action by motion detection as when in routine section that you can find out your echo flex and select as motion detection simply.

So far so good  and you will be proud by yourself rather than you  have to say “Alexa, turn on the XXXX light” which you have to say to Echo show or Alexa device to turn on the smart light previously before you have the echo flex. After you got the echo flex with motion sensor, you don’t have to say it to echo device what to do anymore which the trigger is now echo flex sensor than you are saying to echo.

Then now you are looking for many upgrade routine from now on. For example, you would like to turn off the light automatically after you turn on the right by motion sensor. This would be easy guess that everyone can think about it. 

The best thing can be the routine should be able to take some basic if-else condition so that if the smart light is on and sensor is triggering then turn off the smart light. So that it will be turn on the light when it senses first and the second sensing will turn off the light automatically.

But this will work for most of home based routine but it won’t be true to have this workflow and by second sensing it doesn’t want to be turn off the light because there could be multiple people will be coming into same room within similar time which has one single echo flex sensor.

It is funny to meet all situations and turn on/off the smart light in right way with current limited routine set in Alexa. I think amazon team know about this already but I don’t think they can treat all normal educated people as experienced logic programmers.

And I have found multiple weird way or not simple way to cover turn on or off the device as below;

  1. No motion detection in different routine.  This is kind of working as you can imagine what could be done. But it will need additional routine which you will have many many routine to make your home more smarter in your Alexa app home 🙂 What you have to do is you have to select the echo flex sensor as a trigger and select the option as no motion detection and select the duration as what you need to have.

    But as long as you have select the duration that is more than 00 then this function is not working and your device will be turned on forever as I have tested now (3/6/2021). What you can fix this issue is you have to set the duration as 0 as above and add another action for wait before you call turn off the device action.

    Basically you are moving duration to wait action. What a waste of your time to set this simple routine!  But as long as it is working as what you have intended, it is still good to make your home to be smarter.

  2. This second option doesn’t need two routines but the device is not working well time goes by. What I meant is it is working fine as soon as I have set a routine but few days later it won’t work at all especially for some smart lights.  It ended up the routine can’t turn off the light or turn on the light in either way. 

    Anyway what you have to do for this routine is you can put wait action right after turn on the device. Then it will wait as you have defined in the wait action then follow up on remain action that will turn off the device in the same routine.

    This looks simple and clean than 2 routines that has motion detection and non-detection but the routine execution are buggy and messy and ends up the smart light bulbs are not working well.

So I have spent certain time which shouldn’t be since this should be easier for normal people who doesn’t have any IT experience. But it took me some time for me to find out above cases which I am in IT field more than 20 years.

Sendgrid Java API (샌드그리드 자바 API)로 메일 보내기

샌드그리드를 사용하여 예전부터 이메일을 보내고 있었는데 최근들어 예전 API가 이메일을 발송하지 않아 아무래도 문제가 있는것 같아 새로운 API로 바꾸게 되었다.

사용자 입장에서는 모든게  다 바뀌었고 5-6년전부터 쓰던 API는 하나도 같은게 없었다.  아래의 내용은 샘플과 함께 문제점이 있던것을 고친 내용들이다.

  •  java API jar file download : https://github.com/sendgrid/sendgrid-java/releases/download/4.7.2/sendgrid-java.jar
  •  위의 jar file 만 따로 받아서 사용하면 되는데 그렇게 하면   아래의  error가   런타임에 생긴다.
  • java.lang.SecurityException: Invalid signature file digest for Manifest main attributes    .
  •  이럴때는 가장 쉬운 방법으로는    각종 zip 관련  도구로 META-INT folder 로들어가서  *SF,*.DSF,*RSA 파일들을 모두 지우고 jar 파일을 세이브하면 된다. 아니면 https://github.com/sendgrid/sendgrid-java 에서 코드를 다운받아서  jar 파일을 빌드할때  사이닝 관련된 파일들을 아래와 같이 제외 시킨다.

Maven:

<plugin>
    <groupId>org.apache.maven.plugins</groupId>
    <artifactId>maven-dependency-plugin</artifactId>
    <version>2.6</version>
    <executions>
        <execution>
            <id>unpack-dependencies</id>
            <phase>package</phase>
            <goals>
                <goal>unpack-dependencies</goal>
            </goals>
            <configuration>
                <excludeScope>system</excludeScope>
                <excludes>META-INF/*.SF</excludes>
                <excludes>META-INF/*.DSA</excludes>
                <excludes>META-INF/*.RSA</excludes>
                <excludeGroupIds>junit,org.mockito,org.hamcrest</excludeGroupIds>
                <outputDirectory>${project.build.directory}/classes</outputDirectory>
            </configuration>
        </execution>
    </executions>
</plugin>

ANT:

  1. <jar destfile="app.jar" basedir="${classes.dir}">
    <zipfileset excludes="META-INF/**/*" src="${lib.dir}/bcprov-jdk16-145.jar"></zipfileset>
    <manifest>
    <attribute name="Main-Class" value="app.Main"/>
    </manifest>
    </jar>

    다음은 간단한 샘플 코드들이이다. Personalization을 사용하여 여러 사람들한테 보내거나 BCC등 예전과는 많이 다른 모습을 보인다. 물론 기본적으로 디렉트 API 에서 웹서비스 API로 바뀐게 확연히 들어난다. 

  2. import com.sendgrid.Method;
    import com.sendgrid.Request;
    import com.sendgrid.Response;
    import com.sendgrid.SendGrid;
    import com.sendgrid.helpers.mail.Mail;
    import com.sendgrid.helpers.mail.objects.*;
    import java.io.IOException;
    public class Example {
    // Fully populated Mail object
    public static Mail buildKitchenSink() {
    Mail mail = new Mail();
    Email fromEmail = new Email();
    fromEmail.setName(Example User);
    fromEmail.setEmail(test@example.com);
    mail.setFrom(fromEmail);
    mail.setSubject(Hello World from the Twilio SendGrid Java Library);
    Personalization personalization = new Personalization();
    Email to = new Email();
    to.setName(Example User);
    to.setEmail(test1@example.com);
    personalization.addTo(to);
    to.setName(Example User);
    to.setEmail(test2@example.com);
    personalization.addTo(to);
    Email cc = new Email();
    cc.setName(Example User);
    cc.setEmail(test3@example.com);
    personalization.addCc(cc);
    cc.setName(Example User);
    cc.setEmail(test4@example.com);
    personalization.addCc(cc);
    Email bcc = new Email();
    bcc.setName(Example User);
    bcc.setEmail(test5@example.com);
    personalization.addBcc(bcc);
    bcc.setName(Example User);
    bcc.setEmail(test6@example.com);
    personalization.addBcc(bcc);
    personalization.setSubject(Hello World from the Personalized Twilio SendGrid Java Library);
    personalization.addHeader(X-Test, test);
    personalization.addHeader(X-Mock, true);
    personalization.addSubstitution(%name%, Example User);
    personalization.addSubstitution(%city%, Riverside);
    personalization.addCustomArg(user_id, 343);
    personalization.addCustomArg(type, marketing);
    personalization.setSendAt(1443636843);
    mail.addPersonalization(personalization);
    Personalization personalization2 = new Personalization();
    Email to2 = new Email();
    to2.setName(Example User);
    to2.setEmail(test1@example.com);
    personalization2.addTo(to2);
    to2.setName(Example User);
    to2.setEmail(test2@example.com);
    personalization2.addTo(to2);
    Email cc2 = new Email();
    cc2.setName(Example User);
    cc2.setEmail(test3@example.com);
    personalization2.addCc(cc2);
    cc2.setName(Example User);
    cc2.setEmail(test4@example.com);
    personalization2.addCc(cc2);
    Email bcc2 = new Email();
    bcc2.setName(Example User);
    bcc2.setEmail(test5@example.com);
    personalization2.addBcc(bcc2);
    bcc2.setName(Example User);
    bcc2.setEmail(test6@example.com);
    personalization2.addBcc(bcc2);
    personalization2.setSubject(Hello World from the Personalized Twilio SendGrid Java Library);
    personalization2.addHeader(X-Test, test);
    personalization2.addHeader(X-Mock, true);
    personalization2.addSubstitution(%name%, Example User);
    personalization2.addSubstitution(%city%, Denver);
    personalization2.addCustomArg(user_id, 343);
    personalization2.addCustomArg(type, marketing);
    personalization2.setSendAt(1443636843);
    mail.addPersonalization(personalization2);
    Content content = new Content();
    content.setType(text/plain);
    content.setValue(some text here);
    mail.addContent(content);
    content.setType(text/html);
    content.setValue(<html><body>some text here</body></html>);
    mail.addContent(content);
    Attachments attachments = new Attachments();
    attachments.setContent(TG9yZW0gaXBzdW0gZG9sb3Igc2l0IGFtZXQsIGNvbnNlY3RldHVyIGFkaXBpc2NpbmcgZWxpdC4gQ3JhcyBwdW12);
    attachments.setType(application/pdf);
    attachments.setFilename(balance_001.pdf);
    attachments.setDisposition(attachment);
    attachments.setContentId(Balance Sheet);
    mail.addAttachments(attachments);
    Attachments attachments2 = new Attachments();
    attachments2.setContent(BwdW);
    attachments2.setType(image/png);
    attachments2.setFilename(banner.png);
    attachments2.setDisposition(inline);
    attachments2.setContentId(Banner);
    mail.addAttachments(attachments2);
    mail.setTemplateId(13b8f94f-bcae-4ec6-b752-70d6cb59f932);
    mail.addSection(%section1%, Substitution Text for Section 1);
    mail.addSection(%section2%, Substitution Text for Section 2);
    mail.addHeader(X-Test1, 1);
    mail.addHeader(X-Test2, 2);
    mail.addCategory(May);
    mail.addCategory(2016);
    mail.addCustomArg(campaign, welcome);
    mail.addCustomArg(weekday, morning);
    mail.setSendAt(1443636842);
    ASM asm = new ASM();
    asm.setGroupId(99);
    asm.setGroupsToDisplay(new int[]{4, 5, 6, 7, 8});
    mail.setASM(asm);
    // This must be a valid [batch ID](https://sendgrid.com/docs/API_Reference/SMTP_API/scheduling_parameters.html) to work
    // mail.setBatchId(“sendgrid_batch_id”);
    mail.setIpPoolId(23);
    MailSettings mailSettings = new MailSettings();
    BccSettings bccSettings = new BccSettings();
    bccSettings.setEnable(true);
    bccSettings.setEmail(test@example.com);
    mailSettings.setBccSettings(bccSettings);
    Setting sandBoxMode = new Setting();
    sandBoxMode.setEnable(true);
    mailSettings.setSandboxMode(sandBoxMode);
    Setting bypassListManagement = new Setting();
    bypassListManagement.setEnable(true);
    mailSettings.setBypassListManagement(bypassListManagement);
    FooterSetting footerSetting = new FooterSetting();
    footerSetting.setEnable(true);
    footerSetting.setText(Footer Text);
    footerSetting.setHtml(<html><body>Footer Text</body></html>);
    mailSettings.setFooterSetting(footerSetting);
    SpamCheckSetting spamCheckSetting = new SpamCheckSetting();
    spamCheckSetting.setEnable(true);
    spamCheckSetting.setSpamThreshold(1);
    spamCheckSetting.setPostToUrl(https://spamcatcher.sendgrid.com);
    mailSettings.setSpamCheckSetting(spamCheckSetting);
    mail.setMailSettings(mailSettings);
    TrackingSettings trackingSettings = new TrackingSettings();
    ClickTrackingSetting clickTrackingSetting = new ClickTrackingSetting();
    clickTrackingSetting.setEnable(true);
    clickTrackingSetting.setEnableText(true);
    trackingSettings.setClickTrackingSetting(clickTrackingSetting);
    OpenTrackingSetting openTrackingSetting = new OpenTrackingSetting();
    openTrackingSetting.setEnable(true);
    openTrackingSetting.setSubstitutionTag(Optional tag to replace with the open image in the body of the message);
    trackingSettings.setOpenTrackingSetting(openTrackingSetting);
    SubscriptionTrackingSetting subscriptionTrackingSetting = new SubscriptionTrackingSetting();
    subscriptionTrackingSetting.setEnable(true);
    subscriptionTrackingSetting.setText(text to insert into the text/plain portion of the message);
    subscriptionTrackingSetting.setHtml(<html><body>html to insert into the text/html portion of the message</body></html>);
    subscriptionTrackingSetting.setSubstitutionTag(Optional tag to replace with the open image in the body of the message);
    trackingSettings.setSubscriptionTrackingSetting(subscriptionTrackingSetting);
    GoogleAnalyticsSetting googleAnalyticsSetting = new GoogleAnalyticsSetting();
    googleAnalyticsSetting.setEnable(true);
    googleAnalyticsSetting.setCampaignSource(some source);
    googleAnalyticsSetting.setCampaignTerm(some term);
    googleAnalyticsSetting.setCampaignContent(some content);
    googleAnalyticsSetting.setCampaignName(some name);
    googleAnalyticsSetting.setCampaignMedium(some medium);
    trackingSettings.setGoogleAnalyticsSetting(googleAnalyticsSetting);
    mail.setTrackingSettings(trackingSettings);
    Email replyTo = new Email();
    replyTo.setName(Example User);
    replyTo.setEmail(test@example.com);
    mail.setReplyTo(replyTo);
    return mail;
    }
    // API V3 Dynamic Template implementation
    public static Mail buildDynamicTemplate() {
    Mail mail = new Mail();
    Email fromEmail = new Email();
    fromEmail.setName(Example User);
    fromEmail.setEmail(test@example.com);
    mail.setFrom(fromEmail);
    mail.setTemplateId(d-c6dcf1f72bdd4beeb15a9aa6c72fcd2c);
    Personalization personalization = new Personalization();
    personalization.addDynamicTemplateData(name, Example User);
    personalization.addDynamicTemplateData(city, Denver);
    personalization.addTo(new Email(test@example.com));
    mail.addPersonalization(personalization);
    return mail;
    }
    // Minimum required to send an email
    public static Mail buildHelloEmail() {
    Email from = new Email(test@example.com);
    String subject = Hello World from the Twilio SendGrid Java Library;
    Email to = new Email(test@example.com);
    Content content = new Content(text/plain, some text here);
    // Note that when you use this constructor an initial personalization object
    // is created for you. It can be accessed via
    // mail.personalization.get(0) as it is a List object
    Mail mail = new Mail(from, subject, to, content);
    Email email = new Email(test2@example.com);
    mail.personalization.get(0).addTo(email);
    return mail;
    }
    public static void baselineExample() throws IOException {
    final Mail helloWorld = buildHelloEmail();
    send(helloWorld);
    }
    public static void kitchenSinkExample() throws IOException {
    final Mail kitchenSink = buildKitchenSink();
    send(kitchenSink);
    }
    public static void dynamicTemplateExample() throws IOException {
    final Mail dynamicTemplate = buildDynamicTemplate();
    send(dynamicTemplate);
    }
    private static void send(final Mail mail) throws IOException {
    final SendGrid sg = new SendGrid(System.getenv(SENDGRID_API_KEY));
    sg.addRequestHeader(X-Mock, true);
    final Request request = new Request();
    request.setMethod(Method.POST);
    request.setEndpoint(mail/send);
    request.setBody(mail.build());
    final Response response = sg.api(request);
    System.out.println(response.getStatusCode());
    System.out.println(response.getBody());
    System.out.println(response.getHeaders());
    }
    public static void main(String[] args) throws IOException {
    baselineExample();
    kitchenSinkExample();
    dynamicTemplateExample();
    }
    }

미국에서 Apostille(어포스티유) 받은 FBI 범죄경력증명서 

한국 거소 신고증 을 받을려면 범죄경력증명서(FBI Criminal Record)를 미국무부에서  Apostille(어포스티유)받아서 제출해야 하는 규정이 2019년 9월경에 새로 생겨서 이전에 비자를 받았거나 중간에 거소증이 만료되어서 새로 만들거나 해외에서 체류기간이 6개월이 지나면 위의 범죄경력증명서를 제출해야 한다.

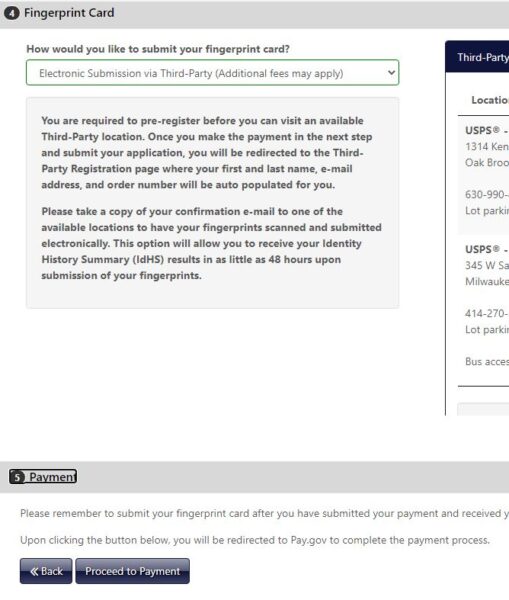
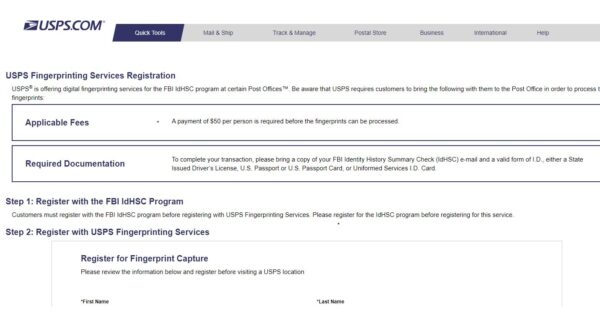
복잡하지만 밑의 과정을 거쳐야 한다.먼저 밑의 1번 과정을 하면서 신청을 할때 USPS 에서  디지털 지문을 찍고 바로 FBI로 전자지문을 보내면  FBI 로부터  일레트로닉으로 결과를 받겠다고 하면 지문 채취하면서 몇시간내에 바로 이메일로 결과를 받게 된다.  문제는 다른 어포스티유는 주정부에서 받을 수 있지만 범죄기록조회서 혹은 범죄경력증명서는 미국무부에서만 발급이 된다.


Apostille(어포스티유) 받은 FBI 범죄경력증명서

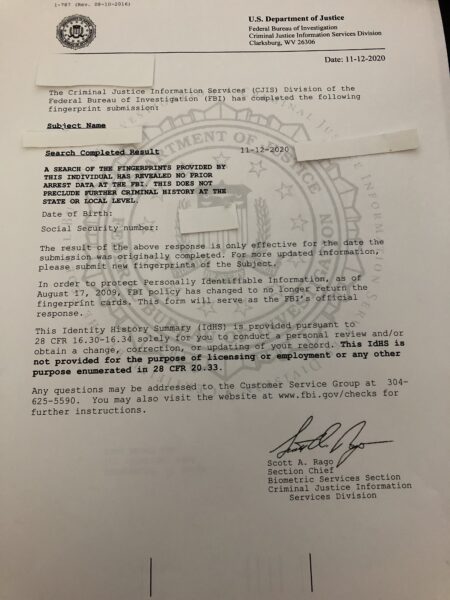
Criminal history record check issued by FBI (①) and apostille confirmation by US Department State office of Authentications (②)

①  https://www.edo.cjis.gov/#/  and  get  finger print at USPS (appointment only)

FBI background check

그리고 나면 밑의 사이트의 링크에서 폼을 작성하고 리턴메일를 구입한뒤에 위에서 받은 결과를 프린트 아웃해서 보내면 서류를 받게 된다. 본인의 경우는 현재 서류를 보낸지 10여일이 지났는데도 받지 못하였다.


FBI background check

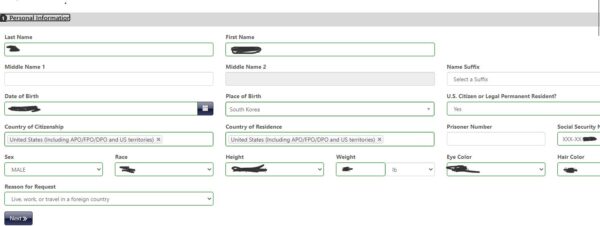
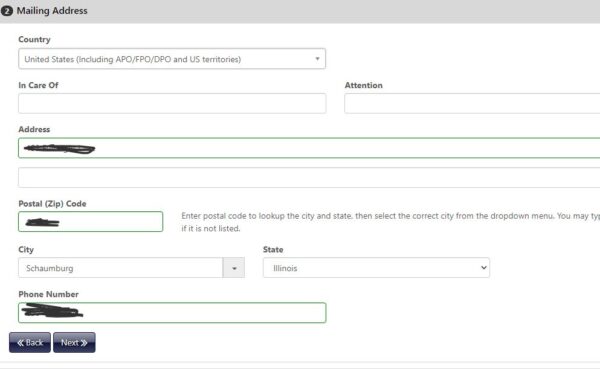
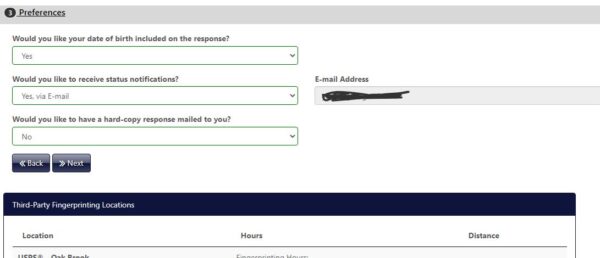
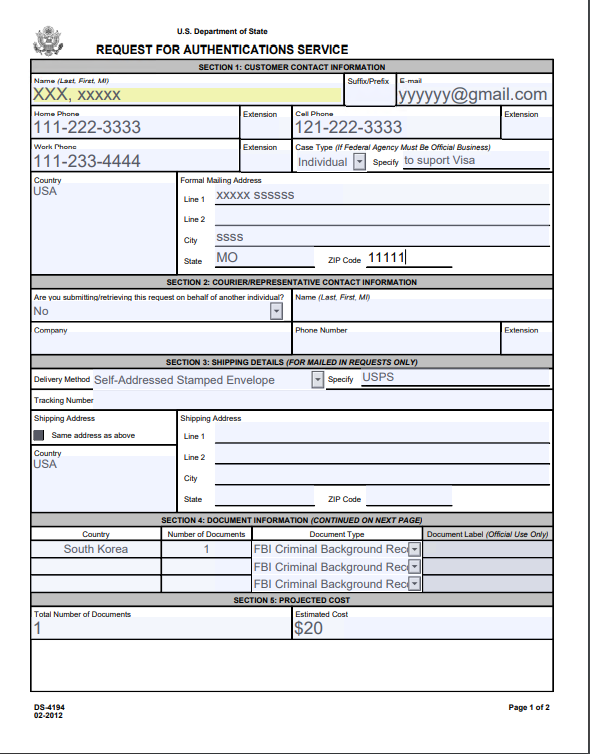
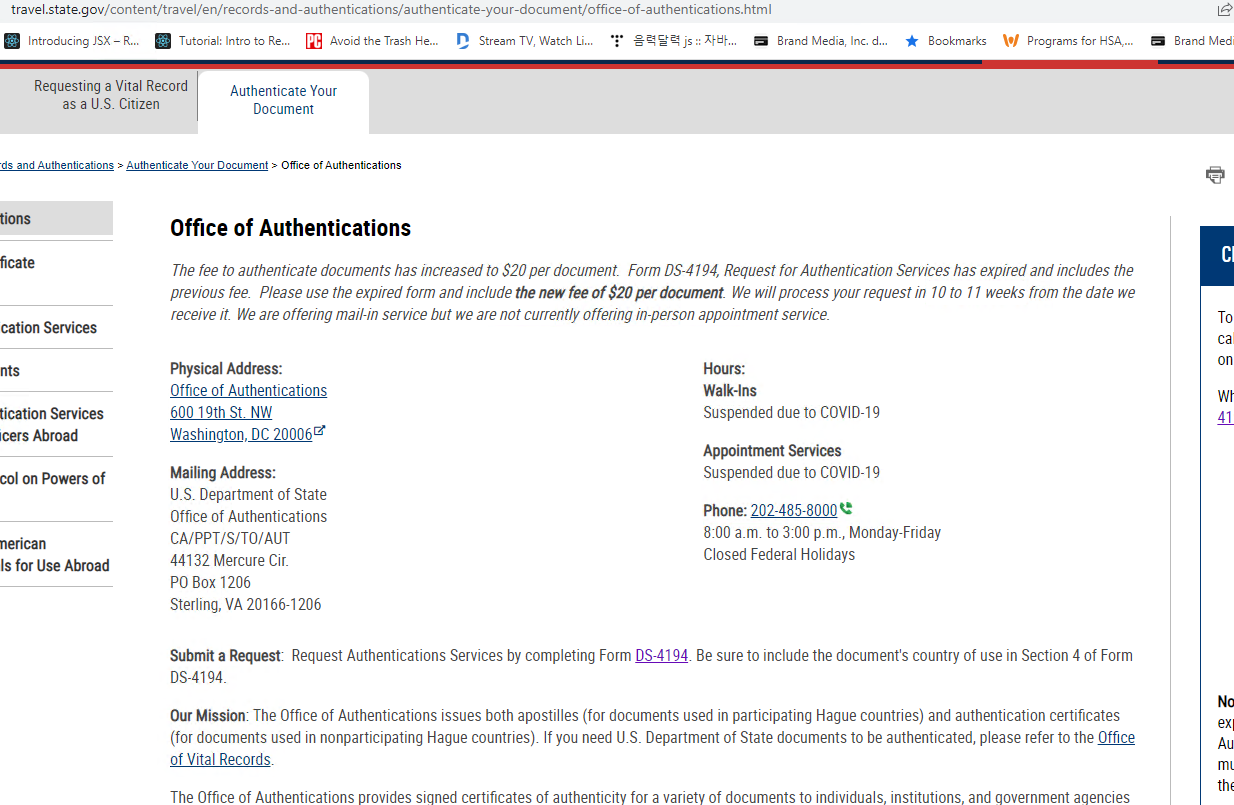
②   일단 위의 리포트를 프린트 아웃해서 밑의 링크를 클릭하면  DS-4194 링크를 클릭하면 바로 중요한 정보를 밑의 사진을 참조하여 정보를 넣은 다음에 밑의 주소로 $20 체크를 동봉하여 보낸다.   “U.S.
Department of State.”  로 받는 사람으로 적어서 보낸다.

FBI 범죄기록 어포스티유 DS-4194


​Federal Documents such as  FBI clearances are authenticated by the US Authentications Office.

https://travel.state.gov/content/travel/en/records-and-authentications/authenticate-your-document/office-of-authentications.html

 – ​Mailing Address:
U.S. Department of State Office of Authentications
CA/PPT/S/TO/AUT
44132 Mercure Cir.
PO Box 1206
Sterling, VA 20166-1206

Phone:202-485-8000
Monday through Friday


코비드 관련해서 미국무부의 서류 처리가 늦어져서 삼개월이 지나서 받았다. 아마도 코비드가 없었다면 일이주 내로 받을지 모르겠지만 현재 코비드 기간중에는 서류 진행이 늦은 것인지 평상시에도 그런것인지 자세한 내용은 알수 없다.  또 특히 따로 급행으로 진행되는 방법이 있는지도 확인이 된바 없다. 브로커들을 통해서 하더라도 특히 따로 빨리 되는 방법이 없을 듯 하다. 단지 서류 진행을 도움을 줄것이라고 생각된다. 범죄기록 어포스트유가 필요하다면 브로커를 시키든 개인이 직접하든 많은 시간의 여유를 두고 하는 게 좋지 않을까 생각한다.  아그리고 리터메일은 페덱스( Fedex)로 하였지만 현재 국무부는 페덱스를 사용하지 않는다고 바로 USPS를 통해서 이메일을 보냈다. 반송메일 서비스는 꼭 USPS로 사용하는게 조금이라도 지연되지 않는 방법일듯 하다.


현재 웹사이트에 걸려진 시간은 10-11주가 걸려야  서류를 받을수 있고 요금도 새로 $20으로 올랐다.


어포스티유 소요기간
어포스티유 소요기간
error: Content is protected !!