WordPress and woocommerce integration with native flat shipping set up

Shipping is always one of the more complicated things.

And what we recommend is a simple flat rate, which is not easy to say simply because we do not know the product well.

Shipping price is mainly set up with the following contents.

  • Variable amount by weight, location and delivery speed
  • A flat rate, such as $5.00, regardless of what the customer orders
  • FREE Shipping
  • In-store pick up

As you may be familiar with shipping, the shipping companies include USPS, UPS and Fedex. If you choose one, the weight and size of all the products you are uploading must be accurately applied to the product in order to calculate the shipping cost accurately.

You can also print the shipping label directly, but in this case, you will have to purchase various extension software as a plug-in and receive service separately.

Because of this, my first recommendation is to start with a flat shipping fee ($5-10) depending on the price.

When the number of transactions on the site rises to a certain level, it would be good to add and improve the shipping service at that time. Or, if you make it before that and pay a monthly usage fee as a service cost, the site operation cost will be bigger.

Then, I will write about the function of adding the shipping fee.

First, when you log in to the admin page, select WooCommerce from the left menu, and then select Settings from the sub menu. As shown in the image below, you can select Shipping.
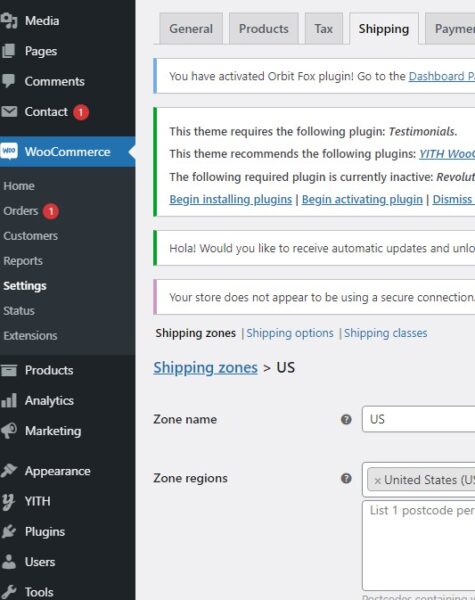
woocommerce_Shipping

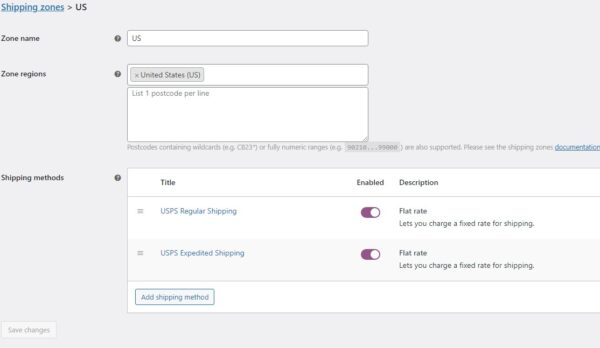
You can create a Shipping Zone within it. If the shipping address corresponds to the region created here, the shipping method is automatically displayed in the cart.

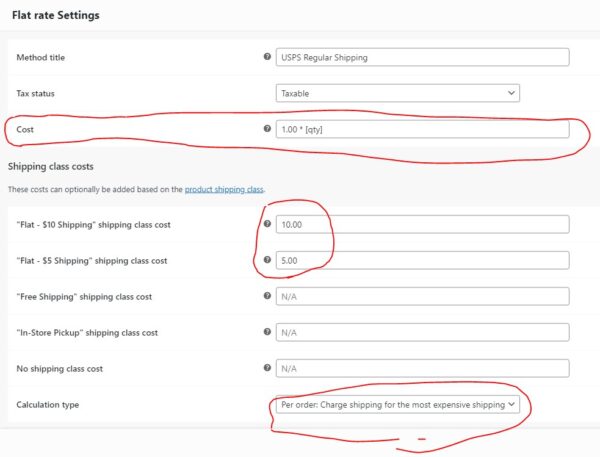
If you select USPS Regular Shipping, the page where you can modify it appears as follows. The cost section is the base rate. The base price is $1, and the base rate increases as the number of products increases.

For example, if the shipping class cost of a product is set up at $5 and you buy 2 products, the shipping price will be 1*2 + 5 = $7. (1.00 * [qty] + $5)
woocommerce_Shipping


In the same way as above, USPS Expedited Shipping can be created with the following shipping calculation method.

The default base calculation is 10 * ( 1.[qty] ) , that is, if you buy 1, the base price is $11 plus the Product Shipping Class Cost.

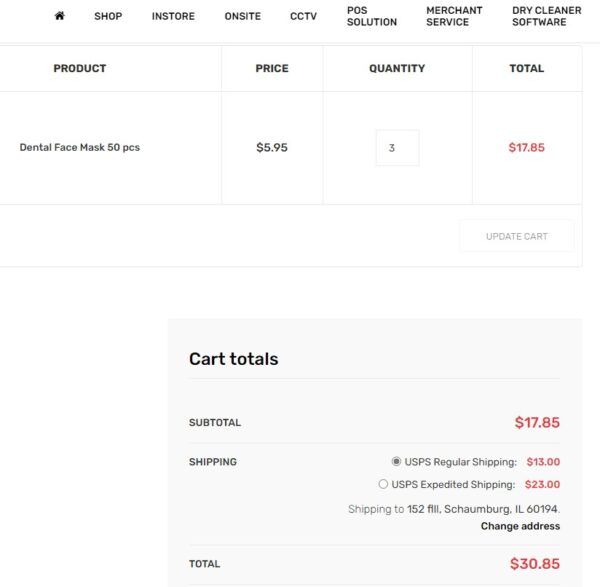
For example, if you purchase 3 products with Shipping Class Cost of $10 like the shopping cart below and select Expedited Shipping, the shipping price is 10*(1.3) +10 = $23.
woocommerce_Shipping

It was a way to set up shipping options.
Below are the steps to set a specific shipping price for a product.

First of all, as explained above.. Shipping Class Cost can be set for the product itself.

woocommerce_Shipping


Just select Shipping Class as shown above. Then it will come out like below.


Select “Add Shipping Class” to create a new shipping class and click the Save button on the left.

The generated class should be directly connected to the product.

Select “Products” on the left menu and select “All Products” from the menu below. After selecting the desired product, select Shipping and select “Shipping Class” correctly.


In addition, if you need to set up freeship or in-store pickup in more detail as a regional zone, you can add more freeship or in-store pickup by selecting a state in the first zone setup above.

How to change chrome browser to full screen

When using the Chrome browser or other browsers as an app, especially when you don’t want to show the URL, changing it to full screen is probably the basic thing as a finished app.

The following is how to change the Chrome browser to full screen.

  1. Press the F11 key on your keyboard to go to full screen right away.
  2. Click the 3 dots at the top right end of the browser to bring up the options menu. Click the square icon in the middle to change to full screen.
  3. You can change to full screen without doing #1 and #2 above with the java script below.<script>

    function myFullFunction() {

    var docElm = document.documentElement;
    if (docElm.requestFullscreen) {
    docElm.requestFullscreen();
    }
    else if (docElm.mozRequestFullScreen) {
    docElm.mozRequestFullScreen();
    }
    else if (docElm.webkitRequestFullScreen) {

    docElm.webkitRequestFullScreen();
    }

    }

    </script>

<body onload=”myFullFunction()”>


However, the code above can be problematic for tablelets, phones, or Chromebooks.

“Failed to execute ‘requestFullScreen’ on ‘Element’: API can only be initiated by a user gesture.”

This is because any event can only work properly by creating it.

I haven’t found another way in particular yet, but I can walk around it in the following way, but I don’t recommend it.


function toggleFullScreen() {
if (!document.fullscreenElement) {
document.documentElement.requestFullscreen();
} else {
if (document.exitFullscreen) {
document.exitFullscreen();
}
}
}

document.addEventListener(“keypress”, function(e) {
if (e.keyCode === 13) {
toggleFullScreen();
}
}, false);

That is, you have to click the Enter key or the Return key again.

To return to normal mode from full screen like this, do #1 or #2 above, or click the X mark to return to normal mode by moving the mouse cursor to the top of the browser screen.

Redirecting the page to another page – building a website

Problems often arise when you click on the wrong link, which already appears in Google searches as a link to the old URL. This is a useful tip in that case.

Let’s create an old file name and put the code below. This is a method of forcibly redirecting the page by putting the url in the head part.

Website has an issue after Domain name transfer

The domain name has been transfer to godaddy from network solution.
The initially it seems to be working fine but it is showing below error message at the browser.

Hmmm… can’t reach this pagepbindustries.com refused to connect.
Try:

Checking the connection
Checking the proxy and the firewall
ERR_CONNECTION_REFUSED

Then I have tried in many different ways as below;

refreshing the browser
restarting system
clear the proxy setting and cash of browser
flushing DNS (ipconfig /flushdns ) – You need to open the window shell as administrator

But none of them are working properly

And I have checked with phone network which the website is working fine which proves that somehow the domain name transfer and hosting is fine.

It might be ip issue that I have checked the domain name’s ipaddress which has been changed properly too.

And I have review the DNS set up again which can be

The most common CNAME host is www, with the @ symbol entered for the Points to field. This will make www.damoastore.com load to the same webpage as the root domain, damoastore.com.

So I will wait for 24 hours whether it can be corrected or not. I am still thinking this could be the issue of all caching which could be remapped after 24 hours.

YES!

The weird behavior has been corrected within 24 hours which after domain name transfer and activation at the godaddy, the new ipaddress might not be bind properly for some time.

I think this will be the issue at the godaddy which they should fix this kinds of conflict.

OpenBravo with CreditCall EMV integration


Client Configuration


<?xml version=”1.0″ encoding=”utf-8″?>

<!–File should be named client.config.xml and placed in same directory as client sample –>

<ChipDnaClient version=”1.0.0″>

<!– Must match Terminal attribute posid in server config –>

<PosId>Till1</PosId>

<!– Key can be obtained from gateway control pannel –>

<ApiKey>32X322S8dzvC565F62hfGD548FMkZ674</ApiKey>

<!– Must match socket tag from server config–>

<Server>127.0.0.1:1869</Server>

</ChipDnaClient>


  1. PaymentPanelEMV.java


package com.openbravo.pos.payment;


  1. PaymentGatewayFac.java

package com.openbravo.pos.payment;


  1. PaymentGatewayCreditCall.java

package com.openbravo.pos.payment;


  1. JPanelConfigPayment.java

com.openbravo.pos.config;


  1. CreditCall.java

com.bm.pos.payment;


StartPOS.java


Pos_message.properties

label.emvterminalid=Terminal ID

lable.emvserverip=Server IP


For the signature integration;


PaymentPanelEMV.java


if (transactionFinishedEvent == true && (resetMsg != null && (resetMsg.indexOf(“UPDATE:Removed”) != -1 || resetMsg.indexOf(“SIGNATURE_CAPTURED”) != -1))) {


CreditCall.java

if (item.getKey().equals(ParameterKeys.SignatureCaptured) && item.getValue().equals(“True”)) {

retrunValues = retrunValues+”SIGNATURE_CAPTURED”;


server config example for Ingenico-iSC250-RBA


-<Terminal posid=”KINGT2″>

-<PaymentDevices>

-<PaymentDevice>

<Model>Ingenico-iSC250-RBA</Model>

<!– comment out previous line and uncomment one of the following lines for different terminal support –>

<!–Model>Ingenico-iSC250-RBA</Model–>

<!–Model>VeriFone-Mx915-XPI</Model–>

<!–Model>VeriFone-Vx820-XPI</Model–>

<!– id is located on the back of the device, typically looks like 2216340PT015555–>

<Id>xxxxx</Id>

<Protocol>serial</Protocol>

<Port>COM5</Port>

<Baudrate>115200</Baudrate>

<Parity>none</Parity>

<Stopbits>1</Stopbits>

<Databits>8</Databits>

<StandbyMessage>Kaaa</StandbyMessage>

</PaymentDevice>

</PaymentDevices>

</Terminal>


MAke sur eto have proper com port number

error: Content is protected !!